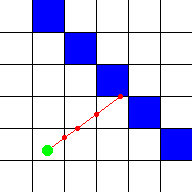

#define mapWidth 24
#define mapHeight 24
#define screenWidth 640
#define screenHeight 480

int worldMap[mapWidth][mapHeight]=
{
  {1,1,1,1,1,1,1,1,1,1,1,1,1,1,1,1,1,1,1,1,1,1,1,1},
  {1,0,0,0,0,0,0,0,0,0,0,0,0,0,0,0,0,0,0,0,0,0,0,1},
  {1,0,0,0,0,0,0,0,0,0,0,0,0,0,0,0,0,0,0,0,0,0,0,1},
  {1,0,0,0,0,0,0,0,0,0,0,0,0,0,0,0,0,0,0,0,0,0,0,1},
  {1,0,0,0,0,0,2,2,2,2,2,0,0,0,0,3,0,3,0,3,0,0,0,1},
  {1,0,0,0,0,0,2,0,0,0,2,0,0,0,0,0,0,0,0,0,0,0,0,1},
  {1,0,0,0,0,0,2,0,0,0,2,0,0,0,0,3,0,0,0,3,0,0,0,1},
  {1,0,0,0,0,0,2,0,0,0,2,0,0,0,0,0,0,0,0,0,0,0,0,1},
  {1,0,0,0,0,0,2,2,0,2,2,0,0,0,0,3,0,3,0,3,0,0,0,1},
  {1,0,0,0,0,0,0,0,0,0,0,0,0,0,0,0,0,0,0,0,0,0,0,1},
  {1,0,0,0,0,0,0,0,0,0,0,0,0,0,0,0,0,0,0,0,0,0,0,1},
  {1,0,0,0,0,0,0,0,0,0,0,0,0,0,0,0,0,0,0,0,0,0,0,1},
  {1,0,0,0,0,0,0,0,0,0,0,0,0,0,0,0,0,0,0,0,0,0,0,1},
  {1,0,0,0,0,0,0,0,0,0,0,0,0,0,0,0,0,0,0,0,0,0,0,1},
  {1,0,0,0,0,0,0,0,0,0,0,0,0,0,0,0,0,0,0,0,0,0,0,1},
  {1,0,0,0,0,0,0,0,0,0,0,0,0,0,0,0,0,0,0,0,0,0,0,1},
  {1,4,4,4,4,4,4,4,4,0,0,0,0,0,0,0,0,0,0,0,0,0,0,1},
  {1,4,0,4,0,0,0,0,4,0,0,0,0,0,0,0,0,0,0,0,0,0,0,1},
  {1,4,0,0,0,0,5,0,4,0,0,0,0,0,0,0,0,0,0,0,0,0,0,1},
  {1,4,0,4,0,0,0,0,4,0,0,0,0,0,0,0,0,0,0,0,0,0,0,1},
  {1,4,0,4,4,4,4,4,4,0,0,0,0,0,0,0,0,0,0,0,0,0,0,1},
  {1,4,0,0,0,0,0,0,0,0,0,0,0,0,0,0,0,0,0,0,0,0,0,1},
  {1,4,4,4,4,4,4,4,4,0,0,0,0,0,0,0,0,0,0,0,0,0,0,1},
  {1,1,1,1,1,1,1,1,1,1,1,1,1,1,1,1,1,1,1,1,1,1,1,1}
};
|
int main(int /*argc*/, char */*argv*/[])
{
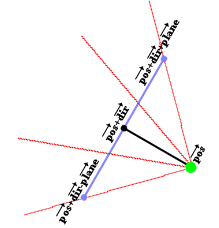
double posX = 22, posY = 12; //x and y start position
double dirX = -1, dirY = 0; //initial direction vector
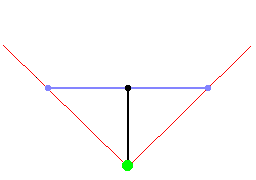
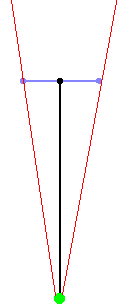
double planeX = 0, planeY = 0.66; //the 2d raycaster version of camera plane
double time = 0; //time of current frame
double oldTime = 0; //time of previous frame
|
screen(screenWidth, screenHeight, 0, "Raycaster");
|
  while(!done())
  {
|
for(int x = 0; x < w; x++)
{
//calculate ray position and direction
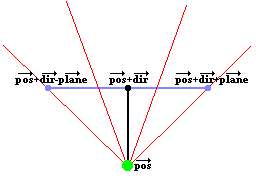
double cameraX = 2 * x / double(w) - 1; //x-coordinate in camera space
double rayDirX = dirX + planeX * cameraX;
double rayDirY = dirY + planeY * cameraX;
|
//which box of the map we're in
int mapX = int(posX);
int mapY = int(posY);
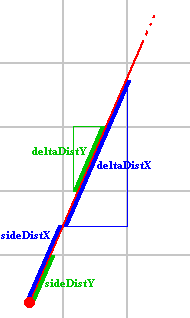
//length of ray from current position to next x or y-side
double sideDistX;
double sideDistY;
//length of ray from one x or y-side to next x or y-side
double deltaDistX = (rayDirX == 0) ? 1e30 : std::abs(1 / rayDirX);
double deltaDistY = (rayDirY == 0) ? 1e30 : std::abs(1 / rayDirY);
double perpWallDist;
//what direction to step in x or y-direction (either +1 or -1)
int stepX;
int stepY;
int hit = 0; //was there a wall hit?
int side; //was a NS or a EW wall hit?
|
      //calculate step and initial sideDist
      if (rayDirX < 0)
      {
        stepX = -1;
        sideDistX = (posX - mapX) * deltaDistX;
      }
      else
      {
        stepX = 1;
        sideDistX = (mapX + 1.0 - posX) * deltaDistX;
      }
      if (rayDirY < 0)
      {
        stepY = -1;
        sideDistY = (posY - mapY) * deltaDistY;
      }
      else
      {
        stepY = 1;
        sideDistY = (mapY + 1.0 - posY) * deltaDistY;
      }
|
      //perform DDA
      while (hit == 0)
      {
        //jump to next map square, either in x-direction, or in y-direction
        if (sideDistX < sideDistY)
        {
          sideDistX += deltaDistX;
          mapX += stepX;
          side = 0;
        }
        else
        {
          sideDistY += deltaDistY;
          mapY += stepY;
          side = 1;
        }
        //Check if ray has hit a wall
        if (worldMap[mapX][mapY] > 0) hit = 1;
      }
|
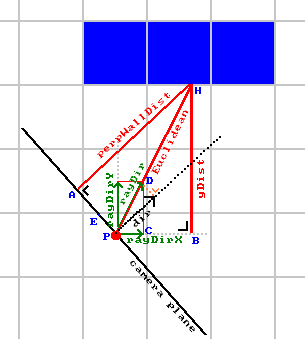
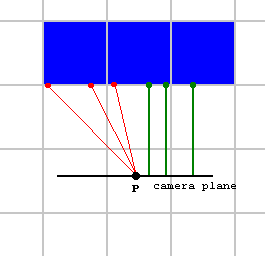 Note that this part of the code isn't "fisheye correction", such a
correction isn't needed for the way of raycasting used here, the
fisheye effect is simply avoided by the way the distance is
calculated here. It's even easier to calculate this perpendicular
distance than the real distance, we don't even need to know the
exact location where the wall was hit.
This perpenducular distance is called "perpWallDist" in the code. One way to compute it is
to use the formula for shortest distance from a point to a line, where the point is where the wall
was hit, and the line is the camera plane:
Note that this part of the code isn't "fisheye correction", such a
correction isn't needed for the way of raycasting used here, the
fisheye effect is simply avoided by the way the distance is
calculated here. It's even easier to calculate this perpendicular
distance than the real distance, we don't even need to know the
exact location where the wall was hit.
This perpenducular distance is called "perpWallDist" in the code. One way to compute it is
to use the formula for shortest distance from a point to a line, where the point is where the wall
was hit, and the line is the camera plane:
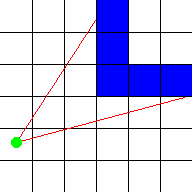
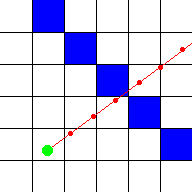
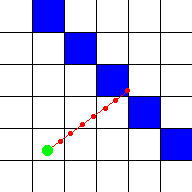
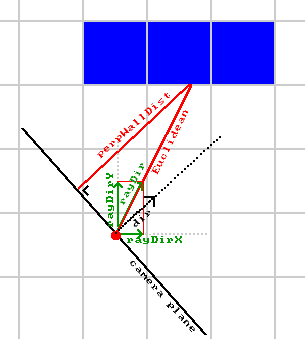 However, it can be computed simpler than that: due to how deltaDist and sideDist were scaled by
a factor of |rayDir| above, the length of sideDist already almost equals perpWallDist. We just need
to subtract deltaDist once from it, going one step back, because in the DDA steps above we went one step
further to end up inside the wall.
However, it can be computed simpler than that: due to how deltaDist and sideDist were scaled by
a factor of |rayDir| above, the length of sideDist already almost equals perpWallDist. We just need
to subtract deltaDist once from it, going one step back, because in the DDA steps above we went one step
further to end up inside the wall.
      //Calculate distance projected on camera direction (Euclidean distance would give fisheye effect!)
      if(side == 0) perpWallDist = (sideDistX - deltaDistX);
      else          perpWallDist = (sideDistY - deltaDistY);
|
 [Thanks to Thomas van der Berg in 2016 for pointing out simplifications of the code (perpWallDist could be simplified and the value reused for wallX).
      //Calculate height of line to draw on screen
      int lineHeight = (int)(h / perpWallDist);

      //calculate lowest and highest pixel to fill in current stripe
      int drawStart = -lineHeight / 2 + h / 2;
      if(drawStart < 0)drawStart = 0;
      int drawEnd = lineHeight / 2 + h / 2;
      if(drawEnd >= h)drawEnd = h - 1;
|
//choose wall color
ColorRGB color;
switch(worldMap[mapX][mapY])
{
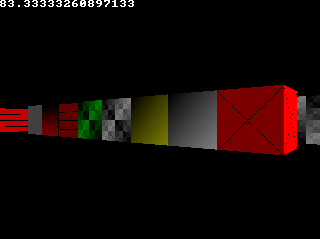
case 1: color = RGB_Red; break; //red
case 2: color = RGB_Green; break; //green
case 3: color = RGB_Blue; break; //blue
case 4: color = RGB_White; break; //white
default: color = RGB_Yellow; break; //yellow
}
//give x and y sides different brightness
if (side == 1) {color = color / 2;}
//draw the pixels of the stripe as a vertical line
verLine(x, drawStart, drawEnd, color);
}
|
    //timing for input and FPS counter
    oldTime = time;
    time = getTicks();
    double frameTime = (time - oldTime) / 1000.0; //frameTime is the time this frame has taken, in seconds
    print(1.0 / frameTime); //FPS counter
    redraw();
    cls();

    //speed modifiers
    double moveSpeed = frameTime * 5.0; //the constant value is in squares/second
    double rotSpeed = frameTime * 3.0; //the constant value is in radians/second
|
    readKeys();
    //move forward if no wall in front of you
    if (keyDown(SDLK_UP))
    {
      if(worldMap[int(posX + dirX * moveSpeed)][int(posY)] == false) posX += dirX * moveSpeed;
      if(worldMap[int(posX)][int(posY + dirY * moveSpeed)] == false) posY += dirY * moveSpeed;
    }
    //move backwards if no wall behind you
    if (keyDown(SDLK_DOWN))
    {
      if(worldMap[int(posX - dirX * moveSpeed)][int(posY)] == false) posX -= dirX * moveSpeed;
      if(worldMap[int(posX)][int(posY - dirY * moveSpeed)] == false) posY -= dirY * moveSpeed;
    }
    //rotate to the right
    if (keyDown(SDLK_RIGHT))
    {
      //both camera direction and camera plane must be rotated
      double oldDirX = dirX;
      dirX = dirX * cos(-rotSpeed) - dirY * sin(-rotSpeed);
      dirY = oldDirX * sin(-rotSpeed) + dirY * cos(-rotSpeed);
      double oldPlaneX = planeX;
      planeX = planeX * cos(-rotSpeed) - planeY * sin(-rotSpeed);
      planeY = oldPlaneX * sin(-rotSpeed) + planeY * cos(-rotSpeed);
    }
    //rotate to the left
    if (keyDown(SDLK_LEFT))
    {
      //both camera direction and camera plane must be rotated
      double oldDirX = dirX;
      dirX = dirX * cos(rotSpeed) - dirY * sin(rotSpeed);
      dirY = oldDirX * sin(rotSpeed) + dirY * cos(rotSpeed);
      double oldPlaneX = planeX;
      planeX = planeX * cos(rotSpeed) - planeY * sin(rotSpeed);
      planeY = oldPlaneX * sin(rotSpeed) + planeY * cos(rotSpeed);
    }
  }
}
|
#define screenWidth 640
#define screenHeight 480
#define texWidth 64
#define texHeight 64
#define mapWidth 24
#define mapHeight 24

int worldMap[mapWidth][mapHeight]=
{
  {4,4,4,4,4,4,4,4,4,4,4,4,4,4,4,4,7,7,7,7,7,7,7,7},
  {4,0,0,0,0,0,0,0,0,0,0,0,0,0,0,0,7,0,0,0,0,0,0,7},
  {4,0,1,0,0,0,0,0,0,0,0,0,0,0,0,0,0,0,0,0,0,0,0,7},
  {4,0,2,0,0,0,0,0,0,0,0,0,0,0,0,0,0,0,0,0,0,0,0,7},
  {4,0,3,0,0,0,0,0,0,0,0,0,0,0,0,0,7,0,0,0,0,0,0,7},
  {4,0,4,0,0,0,0,5,5,5,5,5,5,5,5,5,7,7,0,7,7,7,7,7},
  {4,0,5,0,0,0,0,5,0,5,0,5,0,5,0,5,7,0,0,0,7,7,7,1},
  {4,0,6,0,0,0,0,5,0,0,0,0,0,0,0,5,7,0,0,0,0,0,0,8},
  {4,0,7,0,0,0,0,0,0,0,0,0,0,0,0,0,0,0,0,0,7,7,7,1},
  {4,0,8,0,0,0,0,5,0,0,0,0,0,0,0,5,7,0,0,0,0,0,0,8},
  {4,0,0,0,0,0,0,5,0,0,0,0,0,0,0,5,7,0,0,0,7,7,7,1},
  {4,0,0,0,0,0,0,5,5,5,5,0,5,5,5,5,7,7,7,7,7,7,7,1},
  {6,6,6,6,6,6,6,6,6,6,6,0,6,6,6,6,6,6,6,6,6,6,6,6},
  {8,0,0,0,0,0,0,0,0,0,0,0,0,0,0,0,0,0,0,0,0,0,0,4},
  {6,6,6,6,6,6,0,6,6,6,6,0,6,6,6,6,6,6,6,6,6,6,6,6},
  {4,4,4,4,4,4,0,4,4,4,6,0,6,2,2,2,2,2,2,2,3,3,3,3},
  {4,0,0,0,0,0,0,0,0,4,6,0,6,2,0,0,0,0,0,2,0,0,0,2},
  {4,0,0,0,0,0,0,0,0,0,0,0,6,2,0,0,5,0,0,2,0,0,0,2},
  {4,0,0,0,0,0,0,0,0,4,6,0,6,2,0,0,0,0,0,2,2,0,2,2},
  {4,0,6,0,6,0,0,0,0,4,6,0,0,0,0,0,5,0,0,0,0,0,0,2},
  {4,0,0,5,0,0,0,0,0,4,6,0,6,2,0,0,0,0,0,2,2,0,2,2},
  {4,0,6,0,6,0,0,0,0,4,6,0,6,2,0,0,5,0,0,2,0,0,0,2},
  {4,0,0,0,0,0,0,0,0,4,6,0,6,2,0,0,0,0,0,2,0,0,0,2},
  {4,4,4,4,4,4,4,4,4,4,1,1,1,2,2,2,2,2,2,3,3,3,3,3}
};
|
int main(int /*argc*/, char */*argv*/[])
{
double posX = 22.0, posY = 11.5; //x and y start position
double dirX = -1.0, dirY = 0.0; //initial direction vector
double planeX = 0.0, planeY = 0.66; //the 2d raycaster version of camera plane
double time = 0; //time of current frame
double oldTime = 0; //time of previous frame
Uint32 buffer[screenHeight][screenWidth]; // y-coordinate first because it works per scanline
std::vector
|
screen(screenWidth,screenHeight, 0, "Raycaster");
//generate some textures
for(int x = 0; x < texWidth; x++)
for(int y = 0; y < texHeight; y++)
{
int xorcolor = (x * 256 / texWidth) ^ (y * 256 / texHeight);
//int xcolor = x * 256 / texWidth;
int ycolor = y * 256 / texHeight;
int xycolor = y * 128 / texHeight + x * 128 / texWidth;
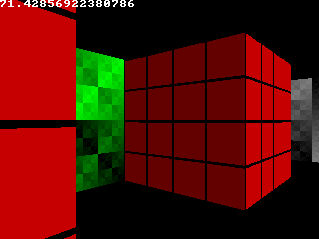
texture[0][texWidth * y + x] = 65536 * 254 * (x != y && x != texWidth - y); //flat red texture with black cross
texture[1][texWidth * y + x] = xycolor + 256 * xycolor + 65536 * xycolor; //sloped greyscale
texture[2][texWidth * y + x] = 256 * xycolor + 65536 * xycolor; //sloped yellow gradient
texture[3][texWidth * y + x] = xorcolor + 256 * xorcolor + 65536 * xorcolor; //xor greyscale
texture[4][texWidth * y + x] = 256 * xorcolor; //xor green
texture[5][texWidth * y + x] = 65536 * 192 * (x % 16 && y % 16); //red bricks
texture[6][texWidth * y + x] = 65536 * ycolor; //red gradient
texture[7][texWidth * y + x] = 128 + 256 * 128 + 65536 * 128; //flat grey texture
}
|
  //start the main loop
  while(!done())
  {
    for(int x = 0; x < w; x++)
    {
      //calculate ray position and direction
      double cameraX = 2*x/double(w)-1; //x-coordinate in camera space
      double rayDirX = dirX + planeX*cameraX;
      double rayDirY = dirY + planeY*cameraX;

      //which box of the map we're in
      int mapX = int(posX);
      int mapY = int(posY);

      //length of ray from current position to next x or y-side
      double sideDistX;
      double sideDistY;

      //length of ray from one x or y-side to next x or y-side
      double deltaDistX = sqrt(1 + (rayDirY * rayDirY) / (rayDirX * rayDirX));
      double deltaDistY = sqrt(1 + (rayDirX * rayDirX) / (rayDirY * rayDirY));
      double perpWallDist;

      //what direction to step in x or y-direction (either +1 or -1)
      int stepX;
      int stepY;

      int hit = 0; //was there a wall hit?
      int side; //was a NS or a EW wall hit?

      //calculate step and initial sideDist
      if (rayDirX < 0)
      {
        stepX = -1;
        sideDistX = (posX - mapX) * deltaDistX;
      }
      else
      {
        stepX = 1;
        sideDistX = (mapX + 1.0 - posX) * deltaDistX;
      }
      if (rayDirY < 0)
      {
        stepY = -1;
        sideDistY = (posY - mapY) * deltaDistY;
      }
      else
      {
        stepY = 1;
        sideDistY = (mapY + 1.0 - posY) * deltaDistY;
      }
|
      //perform DDA
      while (hit == 0)
      {
        //jump to next map square, either in x-direction, or in y-direction
        if (sideDistX < sideDistY)
        {
          sideDistX += deltaDistX;
          mapX += stepX;
          side = 0;
        }
        else
        {
          sideDistY += deltaDistY;
          mapY += stepY;
          side = 1;
        }
        //Check if ray has hit a wall
        if (worldMap[mapX][mapY] > 0) hit = 1;
      }

      //Calculate distance of perpendicular ray (Euclidean distance would give fisheye effect!)
      if(side == 0) perpWallDist = (sideDistX - deltaDistX);
      else          perpWallDist = (sideDistY - deltaDistY);

      //Calculate height of line to draw on screen
      int lineHeight = (int)(h / perpWallDist);

      //calculate lowest and highest pixel to fill in current stripe
      int drawStart = -lineHeight / 2 + h / 2;
      if(drawStart < 0) drawStart = 0;
      int drawEnd = lineHeight / 2 + h / 2;
      if(drawEnd >= h) drawEnd = h - 1;
|
      //texturing calculations
      int texNum = worldMap[mapX][mapY] - 1; //1 subtracted from it so that texture 0 can be used!

      //calculate value of wallX
      double wallX; //where exactly the wall was hit
      if (side == 0) wallX = posY + perpWallDist * rayDirY;
      else           wallX = posX + perpWallDist * rayDirX;
      wallX -= floor((wallX));

      //x coordinate on the texture
      int texX = int(wallX * double(texWidth));
      if(side == 0 && rayDirX > 0) texX = texWidth - texX - 1;
      if(side == 1 && rayDirY < 0) texX = texWidth - texX - 1;
|
            // How much to increase the texture coordinate per screen pixel
      double step = 1.0 * texHeight / lineHeight;
      // Starting texture coordinate
      double texPos = (drawStart - h / 2 + lineHeight / 2) * step;
      for(int y = drawStart; y<drawEnd; y++)
      {
        // Cast the texture coordinate to integer, and mask with (texHeight - 1) in case of overflow
        int texY = (int)texPos & (texHeight - 1);
        texPos += step;
        Uint32 color = texture[texNum][texHeight * texY + texX];
        //make color darker for y-sides: R, G and B byte each divided through two with a "shift" and an "and"
        if(side == 1) color = (color >> 1) & 8355711;
        buffer[y][x] = color;
      }
    }
|
    drawBuffer(buffer[0]);
    for(int y = 0; y < h; y++) for(int x = 0; x < w; x++) buffer[y][x] = 0; //clear the buffer instead of cls()
    //timing for input and FPS counter
    oldTime = time;
    time = getTicks();
    double frameTime = (time - oldTime) / 1000.0; //frametime is the time this frame has taken, in seconds
    print(1.0 / frameTime); //FPS counter
    redraw();

    //speed modifiers
    double moveSpeed = frameTime * 5.0; //the constant value is in squares/second
    double rotSpeed = frameTime * 3.0; //the constant value is in radians/second
|
    readKeys();
    //move forward if no wall in front of you
    if (keyDown(SDLK_UP))
    {
      if(worldMap[int(posX + dirX * moveSpeed)][int(posY)] == false) posX += dirX * moveSpeed;
      if(worldMap[int(posX)][int(posY + dirY * moveSpeed)] == false) posY += dirY * moveSpeed;
    }
    //move backwards if no wall behind you
    if (keyDown(SDLK_DOWN))
    {
      if(worldMap[int(posX - dirX * moveSpeed)][int(posY)] == false) posX -= dirX * moveSpeed;
      if(worldMap[int(posX)][int(posY - dirY * moveSpeed)] == false) posY -= dirY * moveSpeed;
    }
    //rotate to the right
    if (keyDown(SDLK_RIGHT))
    {
      //both camera direction and camera plane must be rotated
      double oldDirX = dirX;
      dirX = dirX * cos(-rotSpeed) - dirY * sin(-rotSpeed);
      dirY = oldDirX * sin(-rotSpeed) + dirY * cos(-rotSpeed);
      double oldPlaneX = planeX;
      planeX = planeX * cos(-rotSpeed) - planeY * sin(-rotSpeed);
      planeY = oldPlaneX * sin(-rotSpeed) + planeY * cos(-rotSpeed);
    }
    //rotate to the left
    if (keyDown(SDLK_LEFT))
    {
      //both camera direction and camera plane must be rotated
      double oldDirX = dirX;
      dirX = dirX * cos(rotSpeed) - dirY * sin(rotSpeed);
      dirY = oldDirX * sin(rotSpeed) + dirY * cos(rotSpeed);
      double oldPlaneX = planeX;
      planeX = planeX * cos(rotSpeed) - planeY * sin(rotSpeed);
      planeY = oldPlaneX * sin(rotSpeed) + planeY * cos(rotSpeed);
    }
  }
}
|
  //swap texture X/Y since they'll be used as vertical stripes
  for(size_t i = 0; i < 8; i++)
  for(size_t x = 0; x < texSize; x++)
  for(size_t y = 0; y < x; y++)
  std::swap(texture[i][texSize * y + x], texture[i][texSize * x + y]);
|
Uint32 color = texture[texNum][texSize * texX + texY];
|

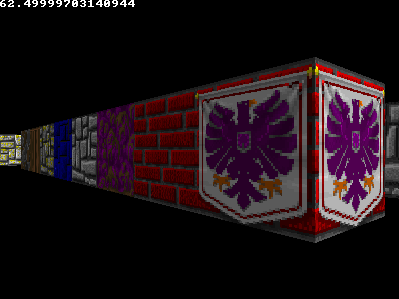
  //generate some textures
  unsigned long tw, th;
  loadImage(texture[0], tw, th, "pics/eagle.png");
  loadImage(texture[1], tw, th, "pics/redbrick.png");
  loadImage(texture[2], tw, th, "pics/purplestone.png");
  loadImage(texture[3], tw, th, "pics/greystone.png");
  loadImage(texture[4], tw, th, "pics/bluestone.png");
  loadImage(texture[5], tw, th, "pics/mossy.png");
  loadImage(texture[6], tw, th, "pics/wood.png");
  loadImage(texture[7], tw, th, "pics/colorstone.png");
|