int main(int argc, char *argv[])
{
  screen(256, 256, 0, "Painting");
  cls(RGB_White);
  int mouseX, mouseY;
  bool LMB, RMB;
  while(!done())
  {
    getMouseState(mouseX, mouseY, LMB, RMB);
    if(LMB) pset(mouseX, mouseY, RGB_Black);
    if(RMB) pset(mouseX, mouseY, RGB_White);
    if(RMB && LMB) cls(RGB_White);
    redraw();
  }
}
|
int main(int argc, char *argv[])
{
  screen(256, 256, 0, "Painting");
  cls(RGB_White);
  int mouseX, mouseY;
  int oldMouseX, oldMouseY;
  bool LMB, RMB;
  while(!done())
  {
    oldMouseX = mouseX;
    oldMouseY = mouseY;
    getMouseState(mouseX, mouseY, LMB, RMB);
    if(LMB) drawLine(oldMouseX, oldMouseY, mouseX, mouseY, RGB_Black);
    if(RMB) drawLine(oldMouseX, oldMouseY, mouseX, mouseY, RGB_White);
    if(RMB && LMB) cls(RGB_White);
    redraw();
  }
}
|
void drawToolbar();
Uint8 brightness = 255; //for the color picker

int main(int argc, char *argv[])
{
  screen(256, 256, 0, "Painting");
  cls(RGB_White);
  int mouseX, mouseY;
  int oldMouseX, oldMouseY;
  bool LMB, RMB;
  ColorRGB fore = RGB_Black; //foreground color
  ColorRGB back = RGB_White; //background color
|
while(!done())
{
oldMouseX = mouseX;
oldMouseY = mouseY;
getMouseState(mouseX, mouseY, LMB, RMB);
if(mouseY >= 64) //drawing area
{
if(LMB) drawLine(oldMouseX, oldMouseY, mouseX, mouseY, fore);
if(RMB) drawLine(oldMouseX, oldMouseY, mouseX, mouseY, back);
if(RMB && LMB) cls(back);
}
else //toolbar area
{
if(mouseX < 128) //color picker
{
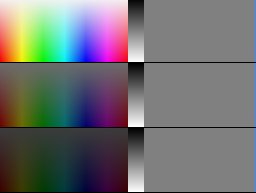
if(LMB) fore = HSVtoRGB(ColorHSV(mouseX * 2, mouseY * 4, brightness));
if(RMB) back = HSVtoRGB(ColorHSV(mouseX * 2, mouseY * 4, brightness));
}
if(mouseX >= 128 && mouseX < 144) //color picker brightness
{
if(LMB || RMB) brightness = (mouseY * 4);
}
}
drawRect(0, 0, w - 1, 64, RGB_Gray);
drawLine(0, 64, w - 1, 64, RGB_Black);
drawToolbar();
redraw();
}
}
|
void drawToolbar()
{
  ColorRGB color;
  for(int x = 0; x <128; x++)
  for(int y = 0; y < 64; y++)
  {
    color = HSVtoRGB(ColorHSV(x * 2, y * 4, brightness));
    pset(x, y, color);
  }
  for(int x = 128; x < 144; x++)
  for(int y = 0; y < 64; y++)
  {
    pset(x, y, ColorRGB(y * 4, y * 4, y * 4));
  }
}
|

void drawToolbar();
void drawBrush(int & x1, int & y1, int x2, int y2, ColorRGB color);
double distance2D(int x1, int y1, int x2, int y2);
bool inBetween(int x1, int y1, int x2, int y2, int x3, int y3);

Uint8 brightness = 255; //for the color picker
int size = 10, step = 5; //brush size and step
bool initiate; //when you just start pressing mouse button

int main(int argc, char *argv[])
{
  screen(384, 384, 0, "Painting");
  cls(RGB_White);
  int mouseX, mouseY;
  int oldMouseX, oldMouseY;
  bool LMB, RMB;
  ColorRGB fore = RGB_Black; //foreground color
  ColorRGB back = RGB_White; //background color
|
  while(!done())
  {
    getMouseState(mouseX, mouseY, LMB, RMB);
    if(!LMB && !RMB) initiate = 1;
    if((LMB || RMB) && mouseY > 64) //drawing area
    {
      if(initiate)
      {
        oldMouseX = mouseX;
        oldMouseY = mouseY;
        if(LMB) drawBrush(oldMouseX, oldMouseY, mouseX, mouseY, fore);
        else if(RMB) drawBrush(oldMouseX, oldMouseY, mouseX, mouseY, back);
        initiate = 0;
      }
      if(distance2D(mouseX, mouseY, oldMouseX, oldMouseY) > (size * step / 100.0))
      {
        if(LMB) drawBrush(oldMouseX, oldMouseY, mouseX, mouseY, fore);
        else if(RMB) drawBrush(oldMouseX, oldMouseY, mouseX, mouseY, back);
      }
      if(RMB && LMB) cls(back);
    }
|
    if(mouseY < 64 && initiate) //toolbar area
    {
      if(mouseX < 128) //color picker
      {
        if(LMB) fore = HSVtoRGB(ColorHSV(mouseX * 2, mouseY * 4, brightness));
        if(RMB) back = HSVtoRGB(ColorHSV(mouseX * 2, mouseY * 4, brightness));
      }
      if(mouseX >= 128 && mouseX < 144) //color picker brightness
      {
        if(LMB || RMB) brightness = (mouseY * 4);
      }
      if(mouseY >= 0 && mouseY < 8 && mouseX > 144 && LMB) //brush size
      {
        size = int(getInput<int>("Enter Size:", false, 144, 0, RGB_Red, 1, RGB_Gray));
        size = max(1, min(255, size));
      }
      if(mouseY >= 8 && mouseY < 16 && mouseX > 144 && LMB) //brush step
      {
        step = int(getInput<int>("Enter Step:", false, 144, 8, RGB_Red, 1, RGB_Gray));
        step = max(1, min(200, step));
      }
    }
|
    drawRect(0, 0, w - 1, 64, RGB_Gray);
    drawLine(0, 64, w - 1, 64, RGB_Black);
    drawToolbar();
    redraw();
  }
  return 0;
}
|
void drawBrush(int & x1, int & y1, int x2, int y2, ColorRGB color)
{
  int x = x1, y = y1;
  if(size > 1)
  {
    if(initiate) drawDisk(x, y, size / 2, color);

    int i = 0;
    while(distance2D(x, y, x2, y2) > (size * step / 100.0) && inBetween(x1, y1, x, y, x2, y2))
    {
      i++;
      x = int(x1 + i * (size * step / 100.0) * (x2 - x1) / distance2D(x1, y1, x2, y2));
      y = int(y1 + i * (size * step / 100.0) * (y2 - y1) / distance2D(x1, y1, x2, y2));
      drawDisk(x, y, size / 2, color);
    }
    x1 = x;
    y1 = y;
  }
  else //if brush size is 1, drawLine looks nicer
  {
    drawLine(x1, y1, x2, y2, color);
    x1 = x2;
    y1 = y2;
  }
}
|
void drawToolbar()
{
ColorRGB color;
for(int x = 0; x < 128; x++)
for(int y = 0; y < 64; y++)
{
color = HSVtoRGB(ColorHSV(x * 2, y * 4, brightness));
pset(x, y, color);
}
for(int x = 128; x < 144; x++)
for(int y = 0; y < 64; y++)
{
pset(x, y, ColorRGB(y * 4, y * 4, y * 4));
}
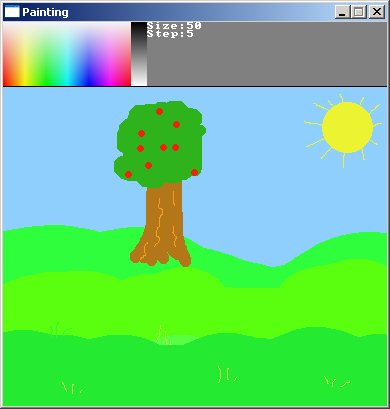
print("Size:", 144, 0);
print(size, 184, 0);
print("Step:", 144, 8);
print(step, 184, 8);
}
double distance2D(int x1, int y1, int x2, int y2)
{
return sqrt(double((x1 - x2) * (x1 - x2) + (y1 - y2) * (y1 - y2)));
}
//returns true if point2 is between point1 and point3 (the 3 points are supposed to be on the same line)
bool inBetween(int x1, int y1, int x2, int y2, int x3, int y3)
{
if((x1 - x2) * (x3 - x2) <= 0 && (y1 - y2) * (y3 - y2) <= 0) return true;
else return false;
}
|
#define screenW 384
#define screenH 384
void drawToolbar();
void drawBrush(int & x1, int & y1, int x2, int y2, ColorRGB color);
double distance2D(int x1, int y1, int x2, int y2);
bool inBetween(int x1, int y1, int x2, int y2, int x3, int y3);
void paint_pset(int x, int y, ColorRGB color, Uint8 opacity);
bool paint_horLine(int y, int x1, int x2, ColorRGB color, Uint8 opacity);
bool paint_drawLine(int x1, int y1, int x2, int y2, ColorRGB color, Uint8 opacity);
bool paint_drawDisk(int xc, int yc, int radius, ColorRGB color, Uint8 opacity);
void clearScreenBuffer(ColorRGB color);
Uint8 brightness = 255; //for the color picker
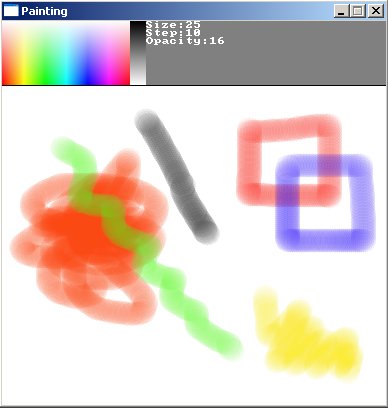
int size = 25, step = 10; //brush size and step
Uint8 opacity = 16;
bool initiate; //when you just start pressing mouse button
Uint32 screenBuffer[screenH][screenW];
double frameTime, oldFrameTime;
int main(int argc, char *argv[])
{
screen(screenW, screenH, 0, "Painting");
clearScreenBuffer(RGB_White);
int mouseX, mouseY;
int oldMouseX, oldMouseY;
bool LMB, RMB;
ColorRGB fore = RGB_Black; //foreground color
ColorRGB back = RGB_White; //background color
|
  while(!done())
  {
    getMouseState(mouseX, mouseY, LMB, RMB);
    if(!LMB && !RMB) initiate = 1;
    if((LMB || RMB) && mouseY > 64) //drawing area
    {
      if(initiate)
      {
        oldMouseX = mouseX;
        oldMouseY = mouseY;
        if(LMB) drawBrush(oldMouseX, oldMouseY, mouseX, mouseY, fore);
        if(RMB) drawBrush(oldMouseX, oldMouseY, mouseX, mouseY, back);
        initiate = 0;
      }
      if(distance2D(mouseX, mouseY, oldMouseX, oldMouseY) > (size * step / 100.0))
      {
        if(LMB) drawBrush(oldMouseX, oldMouseY, mouseX, mouseY, fore);
        if(RMB) drawBrush(oldMouseX, oldMouseY, mouseX, mouseY, back);
      }
      if(RMB && LMB) clearScreenBuffer(back);
    }
    if(mouseY < 64 && initiate) //toolbar area
    {
      if(mouseX < 128) //color picker
      {
        if(LMB) fore = HSVtoRGB(ColorHSV(mouseX * 2, mouseY * 4, brightness));
        if(RMB) back = HSVtoRGB(ColorHSV(mouseX * 2, mouseY * 4, brightness));
      }
      if(mouseX >= 128 && mouseX < 144) //color picker brightness
      {
        if(LMB || RMB) brightness = (mouseY * 4);
      }
      if(mouseY >= 0 && mouseY < 8 && mouseX > 144 && LMB) //brush size
      {
        size = int(getInput<int>("Enter Size:", false, 144, 0, RGB_Red, 1, RGB_Gray));
        size = max(1, min(255, size));
      }
      if(mouseY >= 8 && mouseY < 16 && mouseX > 144 && LMB) //brush step
      {
        step = int(getInput<int>("Enter Step:", false, 144, 8, RGB_Red, 1, RGB_Gray));
        step = max(1, min(200, step));
      }
      if(mouseY >= 16 && mouseY < 24 && mouseX > 144 && LMB) //brush step
      {
        int opacityNoWrap = int(getInput<int>("Enter Opacity:", false, 144, 16, RGB_Red, 1, RGB_Gray));
        opacity = max(0, min(255, opacityNoWrap));
      }
    }
    frameTime = getTicks();
    if(frameTime - oldFrameTime >= 20)
    {
      drawBuffer(screenBuffer[0]);
      drawRect(0, 0, w - 1, 64, RGB_Gray);
      drawLine(0, 64, w - 1, 64, RGB_Black);
      drawToolbar();
      redraw();
      oldFrameTime = frameTime;
    }
  }
  return 0;
}
|
void paint_pset(int x, int y, ColorRGB color, Uint8 opacity)
{
  ColorRGB color2 = INTtoRGB(screenBuffer[y][x]);
  ColorRGB color3 = (color * opacity + color2 * (256 - opacity)) / 256;
  Uint32 colorINT = RGBtoINT(color3);
  screenBuffer[y][x] = colorINT;
}
|
void clearScreenBuffer(ColorRGB color)
{
  for(int y = 0; y < h; y++)
  for(int x = 0; x < w; x++)
  {
    screenBuffer[y][x] = RGBtoINT(color);
  }
}
|