The ScriptedLight Allows you to dynamicly change LightBrightness, LightHue, LightSaturation, LightRadius, VolumeBrightness, VolumeFog, VolumeRadius, DrawScale, LightType and LightEffect during gameplay. These changes can be done by Waves(WAVE_Sinus, WAVE_DoubleSinus, WAVE_SawTooth, WAVE_Square, WAVE_SimpleSquare, WAVE_Random or WAVE_Constant) or Keys(Up to 4 pre-defined combinations of settings), and all of this can be controlled by Triggers or by Father Time.
You have control over the speed, smoothness, amplitude, phase and much more
of the Waves. And, with the ScriptedLight, you can make lights similar to the
TriggerLight, but here the corona will be triggered on and off too! (the
classic, official TriggerLight doesn't do this). A special effect is added:
FX_TriggerFlickerOn, to simulate a tubelight that flickers before going on.
Put the file ScriptedLight.u in the System folder.
Then open this package in the actor class browser. Now you can select the ScriptedLight in Lights --> ScriptedLight, and add one in your map.
If you distribute your map, you have to include the file ScriptedLight.u, otherwise other people will not be able to open your map.
You can select a Wave in the properties of the ScriptedLight --> Object --> InitialState.
The Waves can be seen as a very expanded version of the LightTypes: some of the waves do the same as a LightType, but add control over the speed etc... of the effect (for example, in LT_Strobe you can't set the speed, but with the ScriptedLight you can). There are also some waves that are not comparable to a LightType. And, the waves can be applied to any setting of the light, while the LightTypes only affect the brightness of it. Here's a simple list of Waves compared with a LightType.
Here's a list of Waves that you can't compare with a LightType:
Oh, and you can combine Waves and LightTypes too :)
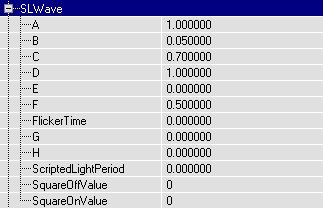
Each Wave uses it's own formula, and with the properties of the ScriptedLight you can change some variables in the formula. Open the Properties of the ScriptedLight and go to SLWave.
There you can set the variables A, B, C, D, E, F, G and H. Not every Wave uses all these variables. Here's a list of the formulas of the waves. In this list, t = Time (in the sinuswaves, it's going from 0 to 2pi and then back 0 again, in all other waves and keys it goes from 0 to 1 and then 0 again), A --> H are the variables you can set. The result of this formula is a number between 0 and 1, and this is multiplied by 255. This final result will become the LightBrightness, LightHue, LightRadius, or whatever the light will get at that particular tick (I'll explain a little further about the timing and ticks).
Formula:
Use:
Warnings:
Formulas:
Use:
Warnings:
Formula:
Use:
Formula:
Use:
Formula:
Use:
Formula:
Use:
This one doesn't have a formula, light is just always on :)
It's used as a normal TriggerLight that triggers the corona as well. More about this later.
(this is what has changed most since version 1.0 of the ScriptedLight Basicly, everything has changed)
Still in the SLWave properties, there is the value ScriptedLightPeriod Here you can fill in the length of one cycle of the light, for example if you set it to 10, one SawTooth wave will take 10 seconds. For the SinusWaves, the "A" variable can affect the period, but as long as you leave "A" to 1, the SinusWave will also take exactly 10 seconds. For the randomwave, you have to set this very low, for example 0.05 seconds, because each cycle for the randomwave is on or off.
Oh, and you can also use a negative period, for example the sawtooth wave will go in the opposite direction then.
So that's it already, much simpeler than the ScriptedLight version 1.0!!
In the properties of the ScriptedLight, go to SLUse.
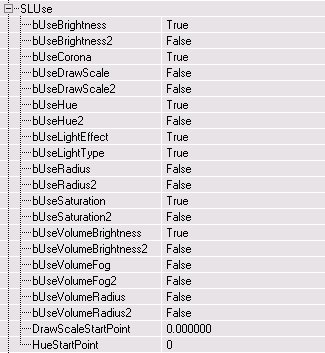
Here you can set what values that will be used by wave formulas. If you set a setting to TRUE, it will get it's value dynamicly from the wave formula and it will IGNORE the value you gave it in "Lighting" or "LightColor". If you set a setting to FALSE, it'll use the value you gave it in "Lighting" or "LightColor".
If you want to use bUseRadius or bUseVolumeRadius, you HAVE to set bNoDelete to FALSE in the advanced properties. In all other cases set it to TRUE (Otherwise the lighting is ugly. Really, very ugly!).
bUseCorona is only used by the RandomWave, SquareWave and the KEYS (more about this later)
bUseLightType and bUseLightEffect are only used by the KEYS.
DrawScaleStartPoint is important if you set bUseDrawScale to True. For the WAVES, you need to use a value ranging from 0 to 1, and the KEYS require a value from 0 to 255. For the KEYS, the final drawscale will be the value you entered diveded by 64. The DrawScale you set in the Display settings is NEVER used.
The settings with a "2" behind their name are only used by the second part of the DoubleSinusWave.
HueStartPoint can be used as a final control for the startpoint of the hue, you may need this in a very rare case.
If you use a corona / fog, set bCorona to True / give a VolumeRadius in the Lighting settings, otherwise the editor doesn't calculate it if you rebuild.
DrawScale is used to change the size of the corona of your light.
Expand "SLTrigger".
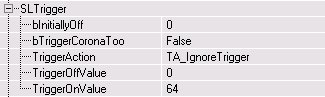
Here you can set a TriggerAction for the ScriptedLight. For this to work, you of course need to add a trigger or other event in your map!!
WARNING!! If you use TA_TriggerToggle, you HAVE to set ReTriggerDelay to 0.5 or higher in the properties of the Trigger. Otherwise it might happen that when the player hits the trigger, this hit gets detected twice and the light is toggled on and immediatly back off. There is no protection system for this in the ScriptedLight, but ReTriggerDelay works fine. BUT: if you use TA_TriggerControlOn or TA_TriggerControlOff, you HAVE to set ReTriggreDelay to 0, otherwise this won't work.
If the light is in it's "On" status, the WAVE is used.
If the light is "Off", the lightbrightness will be the one you enter in TriggerOffValue, while the other settings still wave.
TriggerOnValue doesn't play an important role in the Waves, and is only used for FX_TriggerFlickersOn (more about this later).
if you set bTriggerCoronaToo to True, the corona of the light will be triggered on and off too. This feature is not available in the official TriggerLight, so with the ScriptedLight a new world goes open for you :) Don't set this value if you light doesn't have a corona, because then it might suddenly get one even if you don't want.
If you set in SLTrigger bUseEvent to True, the event you filled in Events --> Event will be casted when:
-a ScriptedLight with TA_IgnoreTrigger goes on
-a FX_TriggerFlickersOn light has finished flickering
You can for example use this to make a broken-tubelight-sound stop after the flickerlight has stopped flickering.
There are 2 InitialStates with the word "KEY" in their name: KEY_Triggered and KEY_Timed.
These use up to 4 KEYS, and the light switches between these keys timed or every time you hit a trigger. A Key is a combination of lightsettings (brightness, hue, LightEffect, corona, volumefog, etc...) that is applied to the light if it's in that particular key.
Most of the properties important to keys can you find in SLKey, so expand this.
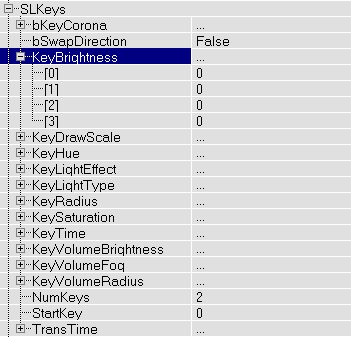
In each value that starts with "Key" in it's name, you can set the lightsettings for every key, for example 4 lightbrightnesses etc... You only have to set the settings that you activated in "SLUse", the others are not affected by keys.
Only the "KeyTime" is used for something else, more about this later.
All the rest is very different for KEY_Trigger and KEY_Timed so I'll explain them seperately.
If you use this, the ScriptedLight goes to the next key everytime you hit a trigger (or it gets another event). It's not possible to make smooth transitions from one key to another, it flashes immediatly to the next one.
ALWAYS give the trigger a ReTriggerDelay of 0.5 or more or it'll not work (same reason as why this is needed for TA_TriggerToggle)
With NumKeys you can set the number of keys to go through: you can set it to 2, 3 or 4. If you set it for example to 3, only the first 3 keys are used, the 4th one is ignored then.
Use StartKey to set the key where the ScriptedLight will start at. 0 is the first key, 1 the second, 2 the third and 3 the fourth (don't confuse this!). For example, the first key, key0, is the one that used KeyBrightness[0], KeyHue[0], etc...
Actually, there's a hidden 5th key! This key uses the standard settings you set in Lighting and LightColor. You can only get this key if you set StartKey to 5 or more, and this 5th key is only used BEFORE you hit the trigger. After that, this key will never be used anymore. You can for example use this to make the light be off first before you hit the trigger.
Obviously, the TriggerActions don't work for KEY_Trigger, because the trigger is already used for looping through the keys.
First of all: this key uses the same ScriptedLightPeriod values the Waves use, so this setting is important for KEY_Timed as well.
You also need the 4 KeyTime and the 4 TransTime settings.
First of all, if you understand it best this way, here's a table of what key is used during what time. Keep in mind that "t" goes from 0 to 1 and then back to 0, with a speed and direction depending on ScriptedLightPeriod.
Now explained in another way:
Smooth transitions mean for example the hue of the light goes smoothly from red (the hue of one key) to yellow (the hue of the next key), going through all orange values that are between the red and yellow. Or, the brightness of the light smoothly goes from 0 to 64.
Don't use bSwapDirection, it was supposed to switch the direction the hue is making during a smooth transition, but it's experimental. (maybe I'll make it work later).
On KEY_Timed, you can use the same TriggerActions as you can use for the waves. Then the keys will only be used when the light is "On".
This is an extra InitialState I added to the light. Basicly, it's a normal triggerlight, but when turning it ON, it flickers a bit first before being completely on. This is like a tubelight: if you have tubelights at home or somewhere else, try to turn them on: most of the times you see them flicker a bit first!
During the flickering, the light uses something similar to WAVE_Random, so you can use the A value to set the chance of the light to be on or off.
You can set the lenghth of the flickering with FlickerTime in SLWave, and you have to use ScriptedLightPeriod for the amount of flickering.
FX_TriggerFlickersOn works with all TriggerActions, except TA_TriggerControlOn, TA_TriggerControlOff and TA_TriggerRandom.
On a slower computer, the editor may crash from time to time when editing the variables of the ScriptedLight (probably because there are so much variables), so save your map as often as possible, or even better: turn on AutoSave
For the sake of your map and the people who have to play it, don't put your map full of ScriptedLights with flashy colors and effects (for example a big boxroom with 15 ScriptedLights that loop through their hue, with saturation=0 and switching between "discolight" and "rotor", or 27 ScriptedLights with volumeradius effects and extra-large coronas with variable drawscale). This kind of lights distract the player, are not realistic and are NOT cool. This is only fun to experiment with, but not for maps that you release on the net.
The ScriptedLight prefers to be used for subtle things, for example to switch to LE_FireWaver at the moment a fire goes on, for the triggerlight that triggers coronas, to trigger a computerscreen between different colors or brightnesses, or to make lights that strobe slowly.
The ScriptedLight now is calculated by the clients independently and NOT by the server, so it can't cause lag, and it doesn't suffer from lag
Although UnrealScript is known to be slow, there is no visible performance drop when using ScriptedLights. (It's been tested on a PII 350Mhz)
There's also an example map, SLDemo.unr, for the ScriptedLight, with 9 boxrooms each with it's own ScriptedLight. Some of the rooms have a trigger, so walk on the trigger for a triggereffect.
There's a disadvantage to the ScriptedLight: you can't preview it in the editor! So you'll have to test how it works in the game. Sometimes your light will look totally different in the editor and in the game!
It is possible to use the ScriptedLight in your map without having to deliver the seperate package scriptedlight.u, by putting the script inside the *.unr map file. Here's how to do it: first open scriptedlight.u in the Actor Class Browser, double click on ScriptedLight inside Light, then copy (CTRL-c) the whole script. Then, go back to the Actor Class Browser, select the Light (don't forget this!), open the menu Class --> New..., type Package MyLevel and Name ScriptedLightMyLevel, press ok and then you get a script window, delete all that is in it and paste the copied script in it. Now just save your map and the ScriptedLightMyLevel class will be stored inside your map file. Call it ScriptedLightMylevel and not just ScriptedLight, so the editor can't confuse this one with the standalone one.
Or here's even an easier way, but you can only use it if you haven't started your map yet: just download the map ScriptedLightMylevel.unr (also included in the zip file) and use it as base for your level. The map only contains one boxroom, and the ScriptedLightMyLevel. The ScriptedLightMyLevel actor is in the Actor Class Browser inside Light. It might even be possible to use this for an already started map if you first open ScriptedLightMylevel.unr and then open your map after that, use a ScriptedLightMyLevel and save it again.
Please keep all credits and copyright notices in the
script
Version 1.1:
Contact me at lode@altern.org for suggestions, bugs, questions, or whatever.
Copyright © 2001, Lode Vandevenne.
Please do not distribute any scripts that are based on this script without
permission of the author.
The author of this script is not responsible for any damage caused by this
script.