A Real "Office Building" Elevator v1.0
Welcome to the first tutorial explaining how to make such an elevator with working inner doors!!
I suggest you read Lode's All about Movers Tutorial first, as this tutorial is based on the knowledge in that one.
We are now going to make a real elevator with a realistic liftcage, inner doors that are attached to it, outer doors on each of the 4 floors, 4 buttons inside the lift and one button on each floor.
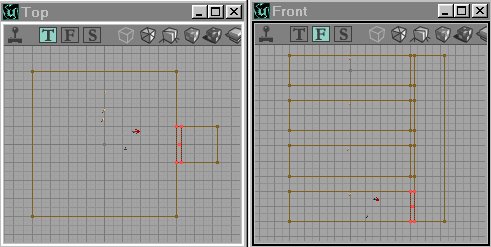
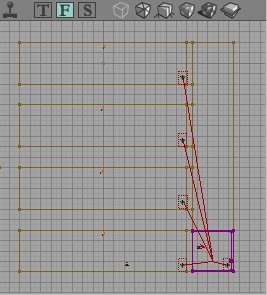
Subtract 4 floors 256*1024*1024 (H*W*B), leaving 128 units between each floor. Now subtract a 1408*256*256 shaft on the left or right side of the room, 32 units away from the rooms. Now subtract 4 doors from each room to the shaft. It should now look like this:
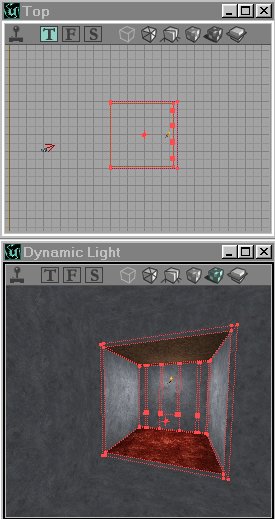
After this make a new 1024*1024*1024 room to make the template of the lift. To make the liftcage use a 256*256*256 brush and subtract a 240*240*240 brush out of it. Place four buttons on the wall of it and give them numbers as texture (1,2,3 and 4). There are some numbers in the Starship.utx package. Also, set all its textures to Bright corners, otherwise there might occur some lighting problems. Intersect the whole thing.
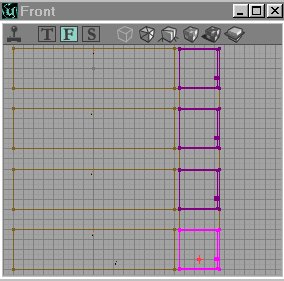
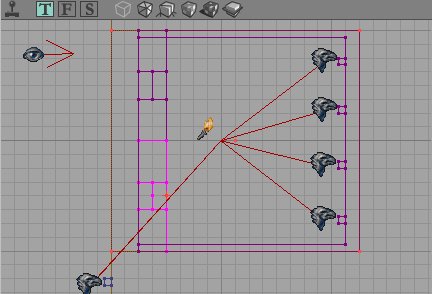
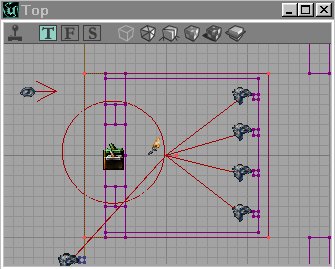
Now place the red brush on the ground level in the shaft, and add an ElevatorMover. Now give it 4 keys: one for each floor. On the following screenshot you can see the 4 keys of the mover.
Open the properties of the ElevatorMover, expand Object and set its InitialState to ElevatorTriggerGradual. Set its Tag to ElevatorMover.
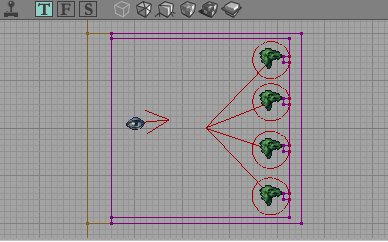
Now add 4 ElevatorTriggers, inside the lift: one for each button. Set the AttachTag of the ElevatorTriggers to "ElevatorMover", so they will move together with the lift. Make their CollisionRadius small enough, for example 25, so you can't press 2 buttons at the same time. Use Radii View to see the radius of the triggers. Set the Event of all the triggers to "ElevatorMover", and set the GotoKeyFrame of the triggers to respectively 0,1,2 and 3.

Now add a button on each floor next to the door to the shaft. Duplicate the four ElevatorTriggers you added, and place one on each floor. Of course, use the correct one for the correct floor, for example place the one with GotoKeyFrame = 0 on the lowest floor. Also, clear the AttachTag of these movers, because they need to stay on their place.
Now the lift can already move to each floor, and has buttons inside and outside. Now here comes the hard part: the double inner doors. The doors need to separate movers, and they have to be able to move up/down together with the lift, and they also need to be able to open and close on each floor.
There is only one way to get this to work: make the doors to be ElevatorMover as well, so they can move up/down together with the lift, and for the open/close movement of the doors use two other movers, and attach the doors to these.
Now make a door brush, I made it with a little window in it, and place it inside the cage on the location you can see on the screenshot below, and add it as and ElevatorMover. Now add in again on the other side, so it will be double doors. Give the doors the same keys as the lift and set their initialstate to ElevatorTriggerGradual. Give both doors the same Tag: "idoors".
Also, duplicate ALL the ElevatorTriggers, place them on EXACTLY the same spot as the old ones, and set the Event of all the new ones to "idoors". (the quickest way to do this is right click on one ElevatorTrigger, choose select all ElevatorTriggers, then right click on one and select "Duplicate". Now all the new ones are selected. Open the properties of all of them at the same time and set the Event. Then move them all to the same position as the old ones.) This way the doors will be able to move up and down together with the lift.
Now, add two doors behind the lift, on a place where nobody can see them. You can place them in the black emptiness outside the rooms, they will still work there.
Set their Key1 like this, and then set them back to Key0:
Now give one of them the Tag "idoor1" and the other one the Tag "idoor2". Set their InitialState to TriggerControl. Now, add 2 triggers on each floor, on this spot:
So that makes a total of 8 triggers. On each floor give one of them the Event "idoor1" and the other one the Event "idoor2".
Finally, select one of the liftdoors that are in the lift, and set its AttachTag to its corresponding idoor: idoor1 or idoor2. Do the same for the other liftdoor.
For the outer doors: you have to add them to each floor. You will have to use a total of 8 doormovers: two on each floor. Give the ones on the lowest floor the tag "odoor1", the one on the next floor "odoor2", etc... and set their InitialState to TriggerControl. Add 1 trigger on each floor, at the same location as the triggers for the innerdoors. Give the new triggers the correct event for the outer doors of its floor.
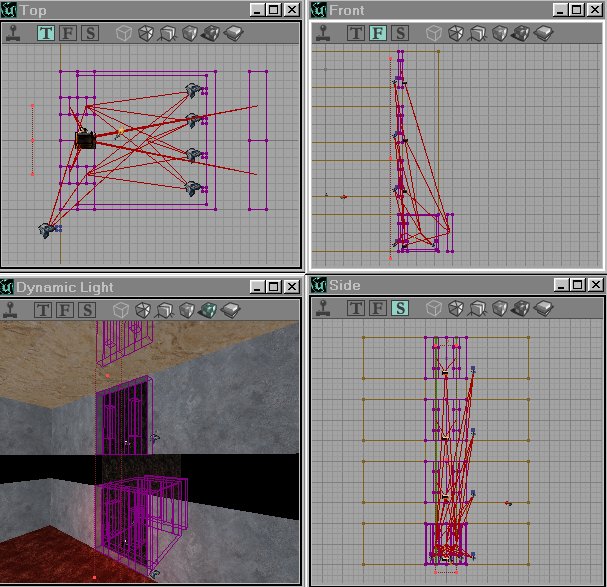
Now your lift will look somewhat like this:
If you did everything well, your map should now have:
-3 ElevatorMovers
-10 regular Movers
-16 ElevatorTriggers
-12 regular Triggers
and all this just to make one Real "Office Building" Elevator!
You can rebuild, save and play your map now.
An example map, dm-elevator.unr, is included in the zipped version.
Contact
Contact me through email: https://lodev.org/contact.html
(c)2000-2001 Lode Vandevenne
Please do not upload this tutorial to any site, only make a link to https://lodev.org/unrealed/. Otherwise older versions keep hanging around on the net.