Lode's Computer Graphics Tutorial

Flood Fill

Table of Contents

Back to index

Introduction

The purpose of Flood Fill is to color an entire area of connected pixels with the same color. It's the Bucket Tool in many painting programs. Here's an example: the original image is on the left. Then a floodfill was started inside the large shape, and the algorithm gave all pixels inside the shape the new color, leaving its borders and the pixels outside intact.


The Flood Fill algorithm is also sometimes called Seed Fill: you plant a seed (the pixel where you start), and, recursively, more and more seeds are planted around the original seed if those pixels have the correct color. Each new seed is responsible for coloring the pixel at its position, and testing for new pixels around it that have to be colored.

There exist many different floodfill algorithm, 3 of them are discussed here (4-way, 8-way and scanline based), and two versions of each: a version with recursion, and a version with a stack. All these algorithms are some form of depth first search (but the scanline based ones are more specialized).

There also exists the so called Boundary Fill, this is very similar to Flood Fill, but will color an area with pixels of a certain color as boundary. The algorithms for boundary fill are very similar apart from the conditions in the tests for planting new seeds.

You can download the full source code of this tutorial here.

Test Program

To test the different flood fill algorithms, we need a test program that allows you to create shapes to fill. The test program is a small version of the painting program described in the "Painting" tutorial. It also includes a benchmark that allows you to compare two different floodfill algorithms and shows the time in milliseconds it took each of them to fill an area 50 times.

Because floodfilling requires reading pixels, we use a buffer to contain the pixels (called screenBuffer[h][w]) instead of reading and writing pixels directly to the screen. All colors used here are integer values, instead of using the ColorRGB struct.

The code given here includes the full test program except the floodfill algorithms (which are explained in the rest of this tutorial) and the paint_drawLine function, which is an exact copy of the drawLine function from QuickCG.cpp but draws to screenBuffer instead of directly to the screen. The full source, including all these functions, can be downloaded here: floodfill.cpp.

Here are the initializations of all the floodFill functions we'll be making, the stack used by some of the functions, the auxiliary functions, and the graphics buffer.

The size of the stack defined here is pretty big (166777216), you can easily make it much smaller, the only case where it has to be this big is when you want to try the worse of the floodfill functions on a very large screen. The best floodfill algorithm doesn't require a big stack at all, unless you're working at huge resolutions.

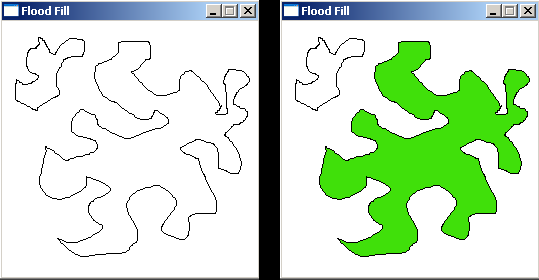
//the floodfill algorithms
void floodFill4(Uint32* screenBuffer, int w, int h,
                int x, int y, Uint32 newColor, Uint32 oldColor);
void floodFill8(Uint32* screenBuffer, int w, int h,
                int x, int y, Uint32 newColor, Uint32 oldColor);
void floodFill4Stack(Uint32* screenBuffer, int w, int h,
                int x, int y, Uint32 newColor, Uint32 oldColor);
void floodFill8Stack(Uint32* screenBuffer, int w, int h,
                int x, int y, Uint32 newColor, Uint32 oldColor);
void floodFillScanline(Uint32* screenBuffer, int w, int h,
                int x, int y, Uint32 newColor, Uint32 oldColor);
void floodFillScanlineStack(Uint32* screenBuffer, int w, int h,
                int x, int y, Uint32 newColor, Uint32 oldColor);

//the auxiliary functions
bool paint_drawLine(int x1, int y1, int x2, int y2, ColorRGB color);
void clearScreenBuffer(ColorRGB color);

//the graphics buffer
#define screenW 256
#define screenH 256
//pixel (x, y) is at index y * screenW + x, the memory structure is per horizontal scanline.
std::vector screenBuffer(screenH * screenW);

Here's the main function of the test program, it can do 3 different mouse actions: The benchmark code does 2 floodfill algorithms of your choice 50 times, remembers the time it took them, displays the resulting times, and sleeps until you press a key. Start the benchmark by pressing space, it'll perform the floodfills at the current mouse position.

int main(int argc, char *argv[])
{
  screen(screenW, screenH, 0, "Flood Fill");
  clearScreenBuffer(RGB_White);
  int mouseX, mouseY;
  int oldMouseX, oldMouseY;
  bool LMB, RMB;

  while(!done())
  {
    oldMouseX = mouseX;
    oldMouseY = mouseY;
    getMouseState(mouseX, mouseY, LMB, RMB);

    //3 different mouse input actions
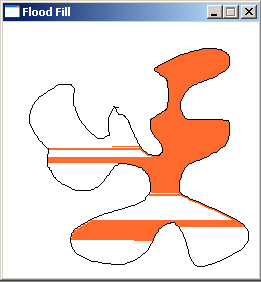
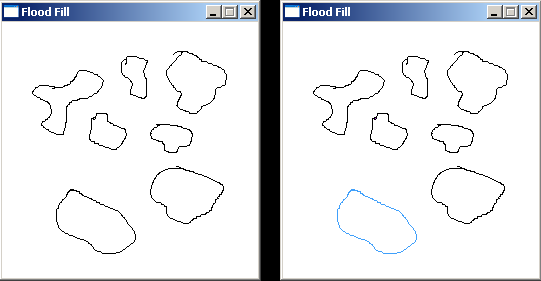
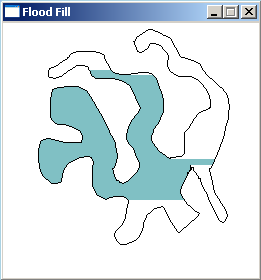
    if(LMB) paint_drawLine(oldMouseX, oldMouseY, mouseX, mouseY, RGB_Black);
    if(RMB)
    {
      Uint32 color = RGBtoINT(ColorRGB((mouseX % 3 + 1) * 64, (mouseY % 8) * 32, (mouseX + mouseY) % 256));
      floodFillScanlineStack(screenBuffer.data(), w, h,
                        mouseX, mouseY, color, screenBuffer[mouseY * w + mouseX]);
    }
    if(RMB && LMB) clearScreenBuffer(RGB_White);

    //benchmark
    readKeys();
    if(keyPressed(SDLK_SPACE))
    {
      float startTime = getTime();
      for(int i = 0; i < 300; i++)
      {
        floodFill4Stack(screenBuffer.data(), w, h,
                        mouseX, mouseY, RGBtoINT(ColorRGB(i%256,255,i%256)), screenBuffer[mouseY * w + mouseX]);
      }
      float endTime = getTime();

      float startTime2 = getTime();
      for(int i = 0; i < 300; i++)
      {
        floodFillScanlineStack(screenBuffer.data(), w, h,
                           mouseX, mouseY, RGBtoINT(ColorRGB(i%256,255,i%256)), screenBuffer[mouseY * w + mouseX]);
      }
      float endTime2 = getTime();

      drawBuffer(&screenBuffer[0]);
      fprint(endTime - startTime, 3, 0, 0, RGB_Black, 1, RGB_White);
      fprint(endTime2 - startTime2, 3, 0, 8, RGB_Black, 1, RGB_White);
      print("press c to continue", 0, 16, RGB_Black, 1, RGB_White);  // any key works, but "space" tends to re-trigger the benchmark
      redraw();
      sleep();
    }

    //redraw the screen each frame
    drawBuffer(&screenBuffer[0]);
    redraw();
  }
  return 0;
}

Here are the stack functions, only used by 3 of the floodFill functions. A stack is a memory structure where you can push new values on top, or pop them again off it to read them. You can only access the top value of a stack, and to read the top value, you have to pop it, thereby removing it.

To keep it simple, we store both coordinates separately on the stack, so push and pop two values each time.
The pop function takes x and y passed by reference, so that this function can change the x and y given in its parameters. The pop function returns true if it successfully got a value from the top of the stack, or false if the stack was empty.

We use C++'s std::vector data structure as stack, since it has built-in support for it.
void push(std::vector<int>& stack, int x, int y)
{
  // C++'s std::vector can act as a stack and manage memory for us
  stack.push_back(x);
  stack.push_back(y);
}

bool pop(std::vector<int>& stack, int& x, int& y)
{
  if(stack.size() < 2) return false; // it's empty
  y = stack.back();
  stack.pop_back();
  x = stack.back();
  stack.pop_back();
  return true;
}

Here's one of the auxiliary functions, clearScreenBuffer. It sets the whole screenBuffer to the given color. The other function, paint_drawLine isn't given here because it's quite big and almost the same as the drawLine function in quickCG.cpp, except that it sets pixels of screenBuffer to the given color, instead of using pset.

void clearScreenBuffer(ColorRGB color)
{
  for(int y = 0; y < h; y++)
  for(int x = 0; x < w; x++)
  {
    screenBuffer[y * w + x] = RGBtoINT(color);
  }
}

Apart from these functions, the test program of course needs you to define the 6 floodFill functions too, but these are given below.

4-Way Recursive Method (floodFill4)

This is the most simple algorithm to make, but also the slowest. Also, since it uses a recursive function, the recursion stack may overflow making it crash when filling larger areas.

You call the function with in its parameters: the start position (where you clicked for the floodfill to start), the oldColor (the color of the area you're overdrawing) and the newColor (the color these pixels should get). The recursion works like this: at the start position, you "plant a seed". Each seed gives the pixel at its position the new color, and then plants a new seed at its 4 neighbors. Each of these new seeds will draw a pixel again and plant even more seeds, but only if fulfills the following conditions:
This is very easy to program:

//Recursive 4-way floodfill, crashes if recursion stack is full
void floodFill4(Uint32* screenBuffer, int w, int h,
                int x, int y, Uint32 newColor, Uint32 oldColor)
{
  if(x >= 0 && x < w && y >= 0 && y < h && screenBuffer[y][x] == oldColor && screenBuffer[y][x] != newColor)
  {
    screenBuffer[y * w + x] = newColor; //set color before starting recursion!

    floodFill4(screenBuffer, w, h, x + 1, y    , newColor, oldColor);
    floodFill4(screenBuffer, w, h, x - 1, y    , newColor, oldColor);
    floodFill4(screenBuffer, w, h, x    , y + 1, newColor, oldColor);
    floodFill4(screenBuffer, w, h, x    , y - 1, newColor, oldColor);
  }
}

The function will keep calling itself more and more until eventually all pixels are filled. The order in which you call the floodFill4 functions for the neighbors doesn't really matter. In the example above it first tries the neighbor to the right, so the algorithm will first draw a line going to the right, until it meets an edge. Then the last called floodFill4 function returns to the pre-last one, which tests the neighbor to the left. Since that one has been drawn alraedy, it tests the one down. That one isn't drawn yet, and if it isn't an edge, the algorithm will continue there, testing to the right again, and so on...

Note how the color is represented as an integer, instead of using the slower ColorRGB struct.

This screenshot shows the floodFill4 algorithm while it's still busy:


8-Way Recursive Method (floodFill8)

This algorithm is pretty similar to the previous one, except it doesn't test 4 neighbors, but 8. This means, that this version of the floodfill algorithm will leak through sloped edges of 1 pixel thick:


Both red pixels are now a neighbor of each other, so the algorithm wil continue behind the sloped black line. The code is very similar to the 4-way one:

//Recursive 8-way floodfill, crashes if recursion stack is full
void floodFill8(Uint32* screenBuffer, int w, int h,
                int x, int y, Uint32 newColor, Uint32 oldColor)
{
  if(x >= 0 && x < w && y >= 0 && y < h && screenBuffer[y][x] == oldColor && screenBuffer[y][x] != newColor)
  {
    screenBuffer[y * w + x] = newColor; //set color before starting recursion!

    floodFill8(screenBuffer, w, h, x + 1, y    , newColor, oldColor);
    floodFill8(screenBuffer, w, h, x - 1, y    , newColor, oldColor);
    floodFill8(screenBuffer, w, h, x    , y + 1, newColor, oldColor);
    floodFill8(screenBuffer, w, h, x    , y - 1, newColor, oldColor);
    floodFill8(screenBuffer, w, h, x + 1, y + 1, newColor, oldColor);
    floodFill8(screenBuffer, w, h, x - 1, y - 1, newColor, oldColor);
    floodFill8(screenBuffer, w, h, x - 1, y + 1, newColor, oldColor);
    floodFill8(screenBuffer, w, h, x + 1, y - 1, newColor, oldColor);
  }
}

Unlike the 4-way version, the 8-way version can fill thin lines, for example the edge of a shape:


The floodFill4 algorithm (the way the bucket tool of painting programs work) would only have colored a few pixels of the black curve, the pixels which only touch a corner aren't considered neighbors in that case.

However, you can't use floodFill8 to fill the inside of the shapes because it'll leak through the sides.

4-Way Method With Stack (floodFill4Stack)

This algorithm does exactly the same as the one with recursion, only it uses a while loop that loops until the stack is empty, and you push new positions to the stack instead of starting another recursion. So the only difference is that we're using our own stack routines now, instead of the ones used for recursive functions. This means we can control the size of the stack, and properly stop the floodfill algorithm if the stack overflows, instead of just letting the program crash. There are also a few other minor differences in the implementation.

The stack routines were described in the Test Program chapter.

//4-way floodfill using our own stack routines
void floodFill4Stack(Uint32* screenBuffer, int w, int h,
                     int x, int y, Uint32 newColor, Uint32 oldColor)
{
  if(newColor == oldColor) return; //avoid infinite loop

  static const int dx[4] = {0, 1, 0, -1}; // relative neighbor x coordinates
  static const int dy[4] = {-1, 0, 1, 0}; // relative neighbor y coordinates

  std::vector<int> stack;
  push(stack, x, y);
  while(pop(stack, x, y))
  {
    screenBuffer[y * w + x] = newColor;
    for(int i = 0; i < 4; i++) {
      int nx = x + dx[i];
      int ny = y + dy[i];
      if(nx >= 0 && nx < w && ny >= 0 && ny < h && screenBuffer[ny][nx] == oldColor) {
        push(stack, nx, ny);
      }
    }
  }
}

This algorithm goes a bit faster, or at least is more robust, than the recursive version.

8-Way Method With Stack (floodFill8Stack)

This is the 8-way version of the previous function, and only differs because it has 4 extra neighbor coordintes to check:

//8-way floodfill using stack instead of recursion
void floodFill8Stack(int x, int y, int newColor, int oldColor)
{
  if(newColor == oldColor) return; //avoid infinite loop

  static const int dx[8] = {0, 1, 1, 1, 0, -1, -1, -1}; // relative neighbor x coordinates
  static const int dy[8] = {-1, -1, 0, 1, 1, 1, 0, -1}; // relative neighbor y coordinates

  std::vector stack;
  push(stack, x, y);
  while(pop(stack, x, y))
  {
    screenBuffer[y][x] = newColor;
    for(int i = 0; i < 8; i++) {
      int nx = x + dx[i];
      int ny = y + dy[i];
      if(nx >= 0 && nx < w && ny >= 0 && ny < h && screenBuffer[ny][nx] == oldColor) {
        push(stack, nx, ny);
      }
    }
  }
}

Recursive Scanline Floodfill Algorithm (floodFillScanline)

This algorithm is based on the following steps:
Like the original floodFill4 and floodFill8 algorithms, this one is recursive, but now each recursion will fill a whole scanline instead of a single pixel, so much less recursions and stack depth are needed. The implementation given below first draws the current scanline, and then tests for scanlines above and below and plants the new seeds by recursively calling itself again.

This algorithm gives the same result as the floodFill4 algorithm, not as the floodFill8 one. If you want, you can modify it to work like the floodFill8 one by making it test for spans above and below one pixel left and right too.

//stack friendly and fast floodfill algorithm, using recursive function calls
void floodFillScanline(int x, int y, int newColor, int oldColor)
{
  if(oldColor == newColor) return;
  if(screenBuffer[y * w + x] != oldColor) return;

  int x1;

  //draw current scanline from start position to the right
  x1 = x;
  while(x1 < w && screenBuffer[y * w + x1] == oldColor)
  {
    screenBuffer[y * w + x1] = newColor;
    x1++;
  }

  //draw current scanline from start position to the left
  x1 = x - 1;
  while(x1 >= 0 && screenBuffer[y * w + x1] == oldColor)
  {
    screenBuffer[y * w + x1] = newColor;
    x1--;
  }

  //test for new scanlines above
  x1 = x;
  while(x1 < w && screenBuffer[y * w + x1] == newColor)
  {
    if(y > 0 && screenBuffer[(y - 1) * w + x1] == oldColor)
    {
      floodFillScanline(screenBuffer, w, h, x1, y - 1, newColor, oldColor);
    }
    x1++;
  }
  x1 = x - 1;
  while(x1 >= 0 && screenBuffer[y * w + x1] == newColor)
  {
    if(y > 0 && screenBuffer[(y - 1) * w + x1] == oldColor)
    {
      floodFillScanline(screenBuffer, w, h, x1, y - 1, newColor, oldColor);
    }
    x1--;
  }

  //test for new scanlines below
  x1 = x;
  while(x1 < w && screenBuffer[y * w + x1] == newColor)
  {
    if(y < h - 1 && screenBuffer[(y + 1) * w + x1] == oldColor)
    {
      floodFillScanline(screenBuffer, w, h, x1, y + 1, newColor, oldColor);
    }
    x1++;
  }
  x1 = x - 1;
  while(x1 >= 0 && screenBuffer[y * w + x1] == newColor)
  {
    if(y < h - 1 && screenBuffer[(y + 1) * w + x1] == oldColor)
    {
      floodFillScanline(screenBuffer, w, h, x1, y + 1, newColor, oldColor);
    }
    x1--;
  }
}

This screenshot shows the scanline floodfill algorithm while it's busy:


Note that, since our memory buffer works per scanline, it is faster to work with horizontal scanlines (as we did here) than with vertical stripes. This because the CPU caches parts of the 2D screenBuffer array, and when working with horizontal lines you're only changing the x-coordinate of that array, and the data it's working with is then much more closely packed to each other in the memory structure, than when you're changing it in the y-direction. When the data is further apart, the chance is higher that not everything needed is cached, making it slower.

Scanline Floodfill Algorithm With Stack (floodFillScanlineStack)

This is very similar to the previous algorithm, except again our own stack routines are used instead of recursion. This implementation also uses two boolean variables, "spanAbove" and "spanBelow" to remember if pixels tested above or below are part of a new span, or one already pushed to the stack. In the implementation with recursion this wasn't needed, because there the spans above and below were drawn first, causing all its pixels to get the newColor already so that other pixels of it couldn't be detected anymore.

//The scanline floodfill algorithm using stack instead of recursion, more robust
void floodFillScanlineStack(int x, int y, int newColor, int oldColor)
{
  if(oldColor == newColor) return;

  int x1;
  bool spanAbove, spanBelow;

  std::vector<int> stack;
  push(stack, x, y);
  while(pop(stack, x, y))
  {
    x1 = x;
    while(x1 >= 0 && screenBuffer[y * w + x1] == oldColor) x1--;
    x1++;
    spanAbove = spanBelow = 0;
    while(x1 < w && screenBuffer[y * w + x1] == oldColor)
    {
      screenBuffer[y * w + x1] = newColor;
      if(!spanAbove && y > 0 && screenBuffer[(y - 1) * w + x1] == oldColor)
      {
        push(stack, x1, y - 1);
        spanAbove = 1;
      }
      else if(spanAbove && y > 0 && screenBuffer[(y - 1) * w + x1] != oldColor)
      {
        spanAbove = 0;
      }
      if(!spanBelow && y < h - 1 && screenBuffer[(y + 1) * w + x1] == oldColor)
      {
        push(stack, x1, y + 1);
        spanBelow = 1;
      }
      else if(spanBelow && y < h - 1 && screenBuffer[(y + 1) * w + x1] != oldColor)
      {
        spanBelow = 0;
      }
      x1++;
    }
  }
}

Here's the result of a benchmark between the floodFill4Stack and the floodFillScanlineStack function: it took floodFill4Stack 239 milliseconds to fill the shape 50 times, while it took floodFillScanlineStack only 34 milliseconds, on an Athlon 1700 CPU in 2004


Last edited: 2018

Copyright (c) 2004-2018 by Lode Vandevenne. All rights reserved.